* Add basic files structure for spanish translation of the doc

* Translate the video tutorial index page

* Translate Before Start page

* Translate What is an app page

* Translate the Bench page

* Translate Conslusion page of the tutorial

* Translate to spanish Tutorial Index page

* Translate to spanish Reports page

* Translate to Spanish Roles Page

* Translate to Spanish the Tutorial Model Page

* Translate to Spanish the tutorial Single Doctypes page

* Translate to Spanish the tutorial Doctype files structure page

* Translate to Spanish the tutorial Start Bench page

* Translate to Spanish the tutorial New App page

* Translate to Spanish the tutorial Client Side Script page

* Translate to Spanish the tutorial Users and records page

* Translate to Spanish the tutorial Setting Up the site page

* Translate to Spanish the tutorial Task Runner page

* Translate to Spanish the tutorial Controllers Page

* Translate to Spanish the tutorial Doctypes page

* Translate to Spanish the tutorial Naming And Linking page

* Translate to Spanish the tutorial Web Views page

* Add basic file structure to translate the bench section of the tutorial

* [docs] Translate to Spanish the tutorial Adding custom domain page

* [docs] Translate to Spanish the tutorial Configuring HTTPS page

* [docs] Translate to Spanish the tutorial Diagnosing the Scheduler page

* [docs] Translate to Spanish the tutorial Settings Site Limits\ page

* [docs] Translate to Spanish the tutorial Setup Production page

* [docs] Translate to Spanish the tutorial Bench ProcFile page

* [docs] Translate to Spanish the tutorial Manual Setup page

* [docs] Translate to Spanish the tutorial Background Services page

* [docs] Translate to Spanish the tutorial Lets Encrypt Setup page

* [docs] Translate to Spanish the tutorial Setup Multitenancy page

* [docs] Translate to Spanish the tutorial Bench Commands page
101 lines
3.3 KiB
Markdown
101 lines
3.3 KiB
Markdown
# Uso de Let's Encrypt para configurar HTTPS
|
|
|
|
##Prerrequisitos
|
|
|
|
1. Necesitas tener una configuración Multitenant
|
|
2. Su sitio debería ser accesible a traves de un dominio válido
|
|
3. Necesitas permisos de administrados en el servidor
|
|
|
|
**Nota : Los certificados de Let's Encrypt expiran cada 3 meses**
|
|
|
|
## Usando el comando bench
|
|
|
|
Ejecutar:
|
|
|
|
sudo -H bench setup lets-encrypt [site-name]
|
|
|
|
Van a aparecer varios prompts, responde a todo. Este comando también va a agregar una entrada a crontab del usuario que esta intentando renovar el certificado cada mes.
|
|
|
|
### Dominios personalizados
|
|
|
|
Puedes configurar Let's Encrypt para [dominios personalizados](adding-custom-domains.html). Solo usando la opción `--custom-domain`
|
|
|
|
sudo -H bench setup lets-encrypt [site-name] --custom-domain [custom-domain]
|
|
|
|
### Renovar Certificados
|
|
|
|
Para la renovación manual de certificados puedes usar:
|
|
|
|
sudo bench renew-lets-encrypt
|
|
|
|
<hr>
|
|
|
|
## Método Manual
|
|
### Descarga el script apropiado de Certbot-auto en el directorio /opt
|
|
|
|
https://certbot.eff.org/
|
|
|
|
### Detener el servicio / proceso nginx
|
|
|
|
$ sudo service nginx stop
|
|
|
|
### Ejecutar Certbot
|
|
|
|
$ ./opt/certbot-auto certonly --standalone
|
|
|
|
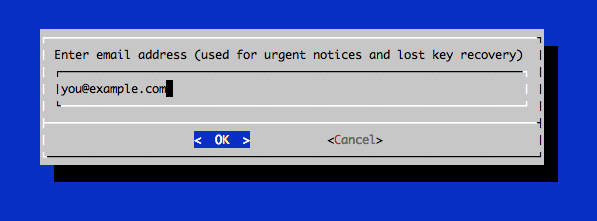
Despues que letsencrypt se inicializa, vas a tener que llenar algunas informaciones. Los prompts pueden variar de si haz usado o no Let's Encrypt antes, pero vamos a guiarte en su primera vez.
|
|
|
|
En el prompt, ingresar la dirección de correo eléctronico que será usada para notificaciones y recuperación de claves perdidas:
|
|
|
|
|
|
|
|
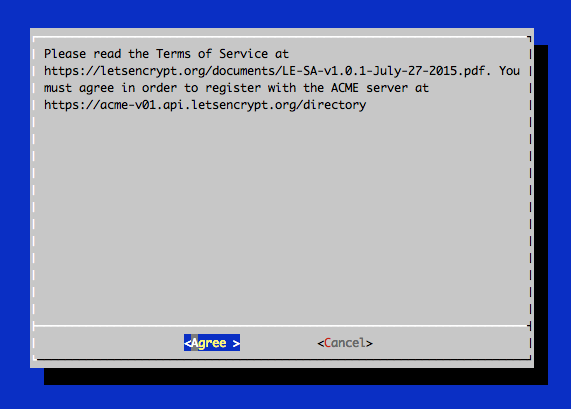
Debes aceptar el acuerdo de subscripción de Let's Encrypt, selecciona Agree:
|
|
|
|
|
|
|
|
Luego ingresa el nombre de su dominio(s). Nota que si deseas un simple certificado para trabajar con
|
|
varios nombres de dominios (ejemplo: example.com y www.example.com), asegurate de incluirlos todos:
|
|
|
|

|
|
|
|
### Archivos de certificados
|
|
|
|
Despues de obtener el certificado, va a tener los siguientes archivos PEM-encoded:
|
|
|
|
* **cert.pem**: El certificado de su dominio
|
|
* **chain.pem**: La cadena del certificado de Let's Encrypt
|
|
* **fullchain.pem**: cert.pem y chain.pem combinados
|
|
* **privkey.pem**: La clave privada de su certificado.
|
|
|
|
Estos certificados estan almacenados en el directorio `/etc/letsencrypt/live/example.com`
|
|
|
|
### Configurar los certificados para su site(s)
|
|
|
|
Vaya al archivo site_config.json del site donde tiene erpnext
|
|
|
|
$ cd frappe-bench/sites/{{nombre_sitio}}
|
|
|
|
Agrega las siguientes lineas al archivo site_config.json
|
|
|
|
"ssl_certificate": "/etc/letsencrypt/live/example.com/fullchain.pem",
|
|
"ssl_certificate_key": "/etc/letsencrypt/live/example.com/privkey.pem"
|
|
|
|
|
|
Regenerar las configuraciones de nginx
|
|
|
|
$ bench setup nginx
|
|
|
|
Reiniciar el servidor nginx
|
|
|
|
$ sudo service nginx restart
|
|
|
|
---
|
|
|
|
### Renovació Automática (experimental)
|
|
|
|
Accede como root o como un usuario con privileges de administrador, ejecuta `crontab -e` y presiona enter:
|
|
|
|
|
|
# renovar el certificado de letsencrypt todos los días primero de cada mes y recibe un email si el comando ha sido ejecutado
|
|
MAILTO="mail@example.com"
|
|
0 0 1-7 * * [ "$(date '+\%a')" = "Mon" ] && sudo service nginx stop && /opt/certbot-auto renew && sudo service nginx start
|